Quantcast
Channel: The Hiking Photographer
Viewing all 189 articles
Browse latest View live

Experience:Nature - Best Landscape Photography so far by Stuart Hodgson

$
0
0

Above: Possibly the most amazing sunset I have witnessed - A roaring Sunset from Haystacks looking west to the Irish Sea. The lake to the right in the distance is Crummock Water, The lake in the middle, to the distance is Ennerdale.


I'm starting this blog post with the best of the best things I've seen. Above is the best beach I've been too, a simply beautiful place - Railay Beach in Krabi, Thailand.


I'm not normally one to get up early, but when I was camping at Buttermere in the Lake District once, I woke quite early - so I went for a wander to the lake. It was a calm, clear, windless day - so peaceful & serene, and here is a pic of Buttermere to try and catch that special time.


A great place to see a long sequence of different waterfalls is Aysgarth Falls in the Yorkshire dales. Autumn time is especially special with the colour of the Fall leaves.


A (photographic) lesson in life

$
0
0

A lesson learned in photography (and life maybe..)


This is a really short post, but a good lesson in photography, and life maybe....so worth a post....

I was on holiday recently in spain, and being a sucker for a some pics in the golden hour, I thought I would get up early one day and watch the sunrise over the sea. Now I much prefer sunrises & sunsets when there is a lot of cloud in the sky - as it makes for a more dramatic composition. But the weather being how it was on holiday (not a cloud in the sky all week - shouldn't complain really :-) made for a sunrise which was a little less dramatic, and the chance for a decent pic was short-lived, see below.

Lesson #1 - Enjoy the moment:

Now the first lesson I need to learn more as a photographer, is that while the chance for a decent pic was limited - I shouldn't feel disheartened. The sunrise itself was a beautiful moment, and pic or no pic, it was a moment to be enjoyed, sitting in the warmth on a sandy beach, with the gentle waves lapping at my feet, whats not to be happy about in that moment? So note to self - enjoy beautiful scenery no matter what the conditions and enjoy & savour the moment more. A decent pic out of it is a bonus!


Lesson #2 - 

Sometimes what you are looking for is right around you


So being a little disheartened at not getting many spectacular surise pictures, I did start to just enjoy sitting around on the beach at dawn and just soak up the morning sun. I then began to notice more around me - and there was a lone seashell lying around, and that made for a cracking pic. Completely unexpected and unplanned, but really happy with the composition (top and below). It was the sort of composition I hadn't really photographed before. It made for a beautiful pic to add to the collection.

So couple of things for me to learn more (and some advice maybe...) - when out and about with the camera - while expansive landscapes make for stunning and beautiful sights, you can also find beautiful sights right under your feet - just develop the eyes to see it!

On another level - a little life lesson; -Stop focussing on things in the distance(and future) all the time, and just enjoy what is around you now and where you are :-)


So it turned out to be quite a productive morning sat by that Mediterranean Sea after all, and with a few pics to show for it, but more importantly it was a time that was enjoyed and with the added bonus of a little insight to life in the process :-)


Cheers

West Burton Waterfall & Aysgarth Falls. Walks in the Yorkshire Dales

$
0
0

West Burton Waterfall & Aysgarth Falls Walk

This post is not a long walk documented in depth - but it is a walk I aim to do in full in future, and this post is to remind me to follow it up at some point!

I've been to Aysgarth falls a number of times - it's a stunning place, and I have also just recently visited West Burton Waterfall on a short trip just to take some photos of West Burton Waterfall, the best of which you can see below:

West Burton Waterfall:

west burton waterfall, best waterfalls in the yorkshire dales, walks in yorkshire, aysgarth falls
West Burton Waterfall one summers day.

The walk that I hope to do in future is one that I found on the walking englishman website, map below, which takes in both West Burton Waterfalls and Aysgarth Falls - so I'm sure it would make an excellent walk, and allow you to take in some of Yorkshires best waterfalls. More information on this walk can be found by visiting this link www.walkingenglishman.com/dales21.htm

Aysgarth falls and west burton falls walk map - route
A walking route taking inWest Burton and Aysgarth Falls
Below you will see a few pics I have taken of Aysgarth Falls in the Autumn to give you a flavour of that particular place.

Aysgarth Waterfalls, lower falls, in the autumn, walk and map, yorkshire
Aysgarth Lower Waterfalls in the Autumn

Aysgarth Waterfalls, lower falls, in the autumn, walk and map
Another shot from a different higher angle of Aysgarth Lower Waterfalls in the Autumn


High-Force

As this post has a bit of a waterfall theme going on - I'm going to share another waterfall pic that I took of High Force, a waterfall on the River Tees, near Middleton-in-Teesdale. 


The above picture was taken on a fleeting visit - but there is a god walking route you can do that takes in lots of waterfalls in the area, below, which I plan to do at some point. More information on this walk can be found at www.mywainwrights.co.uk/


A walk map/route taking in high force, low force, bowlee falls and bleabeck force. distance 7.5 miles / 3hours or so - map from www.mywainwrights.co.uk


Cheers 


Sutton Bank & Gormire Lake Walk

$
0
0
Gormire Lake from Whitestone Cliff

More to follow...


My Hometown Hartlepool

$
0
0
I'm a Monkey Hanger apparently and here's some of my photos from all around Hartlepool, the place where I live :

The Hartlepool historic quay on the marina with a snow covered car park 


A row of old houses behind the Headland Town Wall, with the Docks in the distance


The Sebastopol Cannon - Hartlepool Headland.
The Sebastopol Cannon - Hartlepool Headland. This cannon was captured from the Russian Army at the battle of Sebastopol during the Crimean War (1854-56). In October 1857, the then Secretary of State, Lord Panmure, offered the cannon to Hartlepool Borough Council who gratefully accepted it. 


Elwick church
Elwick church in the pristine snow

Elwick church


Elwick Village, on the outskirts of Hartlepool, with a snow covered village green


Hartlepool Headland

St Hildas Church on the Headland

St Hildas Church on the Headland

St Hildas Church on the Headland

Borough Hall, Hartlepool

A row of old houses behind the Headland Town Wall, with the Docks in the distance

Hartlepool Docks with tyre tracks in a snow covered yard

Hartlepool Historic Quay at the Marina

Foot prints in the snow

Hartlepool Historic Quay at the Marina

Hartlepool Historic Quay at the Marina


Past & Future - two windmills in Hartlepool


Hartlepool Headland
Hartlepool Headland

Thanks for looking through - I hope it makes you see Hartlepool in a different light!

If you wish to use any of the pictures - permission must be granted first - just get in touch! You can email me at hello@stuart-hodgson.com


Helvellyn Snow Walk, with Photos, via Grisedale Tarn

$
0
0

Helvellyn Snow Walk with Photos. Helvellyn Route via Grisedale Tarn – Dollywagon Pike – Nethermost Pike. Walks in the Lake District, Winter 2011


What a walk this was! One of the best (If not most physically demanding) I've ever done in the Lake District. It was such a great walk, with amazing, awe-inspiring views that I decided to document it more than usual, and with all those photos it gave me the idea to start this blog and begin documenting my walks, with pictures and map of my Helvellyn Route

Walking in the Lakes: Some highlights of the Helvellyn Walk in the Snow...


Grisedale Tarn in the snow, Helvellyn Walk, Lake District
Grisedale Tarn, en route up towards Dollywagon Pike

Well what can I say! this was the Longest (7hrs!) Coldest (bottles of water froze!) Hardest (ever tried walking in snow for 10mile?) and Best Helvellyn Walk ever! :-) To this novice snow walker it felt like I'd been to the Himalayas and back in a day


It was my first Helvellyn Snow Walk, one I'd been wanting to do for a while. I'd been following the weather conditions all winter, waiting for the snow to arrive - and this was my chance. So me and my mate set off on the 2 hour drive to the Lake District. There was not a hint of snow on the ground (so roads where clear - which is useful to get there!) until we arrived in the lakes - where we could see the peaks covered in the stuff!

So we wrapped up warm to match the fell conditions report  (inc ski jacket! & plenty of layers - we knew the windchill up top was around -15°C) and set off on our hike....

Usually when I've climbed Helvellyn before we've opted for striding Edge on the ascent and swirall edge on the decent. The edges are just a more exhilarating route I think.  But with the snowy & icy conditions, and this being our first snow walk - we thought it might be a bit hairy (and potentially dangerous) going that way - so we opted for a more gentler, safer, but longer ascent/descent (route map below). 


The route (map taken from www.leaney.org - check out that site it's a good reference)

We started at Glenridding, stocking up with food supplies in the local corner shop. Not knowing what to expect temperature wise with the wind chill factor in exposed places - we thought it wise to be too warm than too cold. I wore my ski-jacket - and whilst it was a bit warm on the first gentle climb - later on at the summit of helvellyn I knew I'd made the right choice.

Some pics at the start of the walk.....


You begin to get pretty high pretty quickly on this route - getting your first great view of Ullswater.


To begin we took the usual route we often take - which takes you past Lanty's Tarn. From that calm and peaceful place we headed up the Grisedale Valley. Normally we fork off up towards Striding Edge upon entering Grisedale Valley, however on this occasion we stayed in eth Valley and headed up to Grisedale Tarn.


Ruthwaite lodge above - a good little place to stop off for a bite to eat - and it just so happened that the lodge marked the snow line boundary. From here on in it was all snow and ice! So we went from no snow - to every where you looked was snow! From here we headed to Grisedale Tarn. Below you can see the peak of St. Sunday Crag.


After passing through the snow line at about 400m, everything around us was now white, and Grisedale Tarn was an amazing sight to see with everything covered in snow. This was the perfect place to stop, cool down a bit, have a cup of tea and get ready for the bigger climb ahead. 

The weather forecast on the day did say sunny spells, and it was on the climb up to Dollywagon Pike where the sun did make its one and only appearance that day for about 30 seconds! I think we were in the best place in the area for that 30 seconds as Grisedale Tarn looked even more stunning with a glimmer of sunlight poking through the clouds and shimmering on its surface. So I guess the forecast was right in a way - but maybe should have said 'Sunny Spell'!


It was on the climb up towards Dollywagon Pike that I decided to put the Kahtoola Microspikes on over my boots that I had just got for Christmas. Up until now it was fine walking in my regular boots, although you had to be careful - but the spikes made a big difference, allowing me to even walk on bare icy rock without slipping, and meaning I could take in the views more rather than constantly watching where I am walking. I'd definitely recommend them if you are walking in icys/light snow conditions (link at bottom of page).


Below - the view down Grisedale Valley from Nethermost Pike.


Some nasty cornices on the peaks! We just followed the tracks and stayed away from the edges, knowing that it's these cornices that usually cause the deaths up on the snowy peaks.


The wind chill up top was crazy! Freezing cold - around -15°C to -20°C. Every part of our body was now under wraps, this is where your kit is important - thick gloves, buff, goggles if possible. Whenever I was taking my glove off to let me use the camera I've never felt my hands so cold - felt like I was risking frost-bite for the sake of taking pics - I hope you appreciate these pictures haha. More seriously I was taught an important lesson - as on one occasion my glove blew away and I nearly lost it! If I did lose it my hand would have suffered a lot - so next time I will definitely be taking spares of a lot of things!


I hoped these crazy people below were experts and knew what hey were doing going into the unknown down the face of nethermost pike!


Frozen water! who'd have thought you could get dehydrated with all that snow and ice about!


At the end of the walk - as we approach Striding Edge Youth Hostel, all that snow becomes a distant memory and we enjoy the gentle stroll down back to Glenridding - knowing a drink and a hot meal in a local pub isn't that far away :-)


Essential Walking Kit in the Snow


I'm not a walking expert - but know the basics. As you can see from the photos - at ground level there was no snow - and on the peaks there was lots. There was also a big difference in temperature as you got higher - and the wind chill on top of the peaks made it quite hazardous, -15°C to -20°C is pretty damn cold! So make sure, as you should on any walk - that you get an accurate Fell report of the conditions up high, and you have the adequate clothing/kit to keep you comfortable at those temperatures. And always plan for the worst - what if you lost a bit of kit - could you survive without it? What if you became injured - do you have enough to keep you warm? Take spares of everything.  Every part of your body needs to be undercover at those temperatures. I nearly learned this the hard way when I took my glove off to take a pic, it blew away - and I nearly lost it over an edge. With no glove on for even a few seconds my hand was freezing - and i didn't have a spare - fortunately I didn't lose my glove and could get it back. But next time I do this sort of walk I will definitely take a spare pair of gloves.

No Crampons? My answer was Kahtoola Microspikes


As I didn't have any crampons, which are quite expensive when you have to get the correct boots to go with them, I instead opted for an alternative  - Kahtoola Microspikes. These clip over existing boots (just make sure you get the right size - base them on getting a size above your shoe size). There are many different variations on the microspikes by different brands - but I done my research - thought that these were the best option - and after using them - I had no complaints and would definitely recommend them. Now crampons definitely have their uses, but the Kahtoola Microspikes done me for this trip. I planned to tread a common path on the hike, only following other peoples footsteps -and knew the route well. I would be staying well away from lots of fresh snow any definitely staying away from snow cornices (make sure you know what these are if you are going walking in the snow for the first time - most walking tragedies happen when walkers fall through Cornices).

I put on the Kahtoola Microspikes when I reached the ice/snow line, and you simply pull these over your boots - 10 second job, and they are great. Giving me more more grip and confidence to even stand on icy rock with no fear of slipping. You hardly even know you have them on as they feel quite comfortable. Now I wouldn't plug any old thing on here, unless I thought they were something good - and these are. If ever you are doing a walk and there is the possibility of ice or snow on route - try and put a pair of these Kahtoola Micro spikes in your bag incase conditions get difficult.

By the way if you click the below image and end up purchasing some through amazon - I'm supposed to get a small amount of commission - so it would be very much appreciated.


Finally - to see this same walk in this blog post in summer, including photos - check out this page - and indeed the full website - great resource for walkers!
http://www.leaney.org/lake_district_walk.php


Blencathra via Sharp Edge Walk with Route Map.

$
0
0

Blencathra Sharp Edge Walk, with photos and route map, via Scales Tarn & Sharp Edge. 


One of the best walk's in the Lake District: Some photo highlights of the Blencathra Walk:


Blencathra sharp edge, blencathra walk, via scales tarn, lake district,

Blencathra via Sharp Edge Walk – Sharp Edge to the right, above Scales Tarn, which is a perfect place for a stop off


view from the summit of blencathra, looking towards keswick and derwent water, lake district
Looking west from the highest summit on Blencathra, Hallsfell Top, where you can make out Derwent Water just off centre. On the horizon to the left you can just make out Great Gable & Scafell Pike.


The Blencathra Sharp Edge Route Map:


blencathra via sharp edge and scales tarn walk route map
The Blencathra Sharp Edge Walk, Route Map. From www.walkingenglishman.com ( a great site for walkers)

This Blencathra walk was done on the 28th March 2012, when we had around 5 glorious days of weather around the full UK (which maybe happens about once a year!). So we made the 2 hour drive from Hartlepool (North-East Coast of England) over the pennines on the A66. 

Blencathra is perhaps the most accessible mountain to travel to in the car if you are entering the lakes from the east on the A66, as it's quite easy to get too, and you can park in a lay-by right on the A66, so avoiding all the country roads. 

Blencathra itself (sometimes called Saddleback), actually has 6 separate fell tops, the highest being Hallsfell at 2,848 ft. You can see the route we took above, starting from near Scales village, then straight up towards Scales Fell and Scales Tarn. From Scales Tarn there are a few options to get to the top - but Sharp Edge is the most exciting, challenging and my best route. I think it looks worse from a distance and in photos than it actually is when you are on it - although it can be dangerous in wet (and very windy) conditions when it becomes rather slippy (due to the rock being smoothed/polished by the boots of walkers over the years) and can be quite dangerous in ice&snow if you don't have the right equipment. Don't let this put you off though - in dry conditions, as long as you have decent foot wear -I would say it's quite safe if you just be careful :-)

From the top of Blencathra - you can either come back down via one of the routes to Scales Tarn - and then it will be quite a quick walk (3hrs) - or you can continue along the summit yo Hallsfell top, then Knowe Crags and come down Blease Fell towards Threlkeld and then walk back along the base of Blencathra (It was a cracking day - so we wanted to extend the walk and we done this longer route in 4hrs)

Now for a few photos of the route, below is the start of the footpath on the A66 not far from the car.


The walk begins pretty steeply up Scales Fell and you are straight into it, so be prepared :-) Here is a shot west towards Derwent Water. Below is a shot east towards the Pennines and from where we came from in the car on the A66. My car is down there somewhere!


After heading up the path then takes you around Scales Fell, where there is now no hint of civilisation. From here you get your first sight of Sharp Edge, below.

Sharp Edge from a distance:


first glimpse of sharp edge, blencathra, lake district

Yup, thats where we are going!


sharp edge, scales tarn, blencathra, lake district

Scales Tarn:

A little tarn en-route is always a good place to stop off for something to eat, and Scales Tarn is a cracking place to stop, with great views. And in this glorious weather we stayed more than usual. Tempting to even have a little swim, until you feel how cold the water is, so maybe not..

sharp edge, scales tarn, blencathra, lake district

Sharp Edge to the right, above Scales Tarn


looking towards sharp edge, blencathra

So we begin the climb towards Sharp Edge....

sharp edge, blencathra


the start of the sharp edge ascent


looking down on scales tarn
Doesn't take long to get quite high on sharp-edge. Looking back down on scales tarn.


Sharp Edge gets pretty steep in parts. Not sure if I would fancy this in the ice & snow!


Sharp Edge:


the best place for a dramatic photo on sharp edge

I always think some of the edges/ridges in the Lake District (sharp edge, striding edge) look worse and more dramatic from a distance and in photos than they actually are when you are on them, and in dry conditions are quite safe. So I'd encourage anyone with a sense of adventure to try them out. It's only in bad weather where you gave got to be extra careful. If you don't like heights at all though, then probs best to avoid them :-)


pretty sheer rock face on sharp-edge, maybe not the best place to lose your footing.....

Bit of a final scramble near the top of Sharp edge

sharp edge, scales tarn, blencathra, lake district

Scales tarn looks quite small from up here...


Above, looking west from the summit of Blencathra, where you can make out Derwent Water just off centre. On the horizon to the left I think you can just make out Great Gable & Scafell Pike.


A bit further on west along the ridge, looking back to the summit of Blencathra.

Now on the decent - with good views looking towards Keswick & Derwent Water.

Heading towards Threlkeld, the end of the walk now approaching

sharp edge, scales tarn, blencathra, lake district
Looking back up towards the summit of Blencathra, I believe you can also come down via this valley


You can just about make out the summit of Blencathra in the distance.


Finally, after around 4hours walking in the glorious hot sunshine, and now out of water - perhaps one of the best sights :-) Time for a refreshing drink...


Further information on Blencathra Walks:


You might also find the following web-pages worth checking out in planning your Blencathra Walk (I did):


I hope this post helps & inspires you to venture up to Blencathra via Sharp Edge. Just be careful on sharp edge (especially in bad weather) - I'm sure you will love it though. Sharp Edge alongside Striding Edge is one of my favourite walking challenges in the Lake District :-)


Twistleton Scar Walk with map & photos.

$
0
0

Twistleton Scar Walk, near Ingleton, with map & photos. [Summer walks in the Yorkshire Dales].

Some highlights from my quick stroll up to Twistelton Scar End:

twistleton scar walk, ingleton, yorkshire dales
Most photos you see online of Twistleton Scar are off the moody, desolate, cloudy nature - heres a rare one with blue sky!


This was a really quick walk - with the sole aim of checking out Twistleton Scar End for (future) photo opportunities! I was in the area with not much time to spare - and as it was a really nice afternoon - I thought I might as well check the place out!

For those looking for a longer walk in this area have a look at this route www.daleswalks.co.uk/walks/twistleton- my walk was done in an hour!

So why a quick walk at Twistleton Scar? I'd previously in the week been browsing around the web for photographic places of interest in the yorkshire dales, and came across some stunning photos of what i found out to be Twistleton Scar End. (I saved off some of these beautiful images which can be found on another blog of mine - Best Nature Photos - with my favourite images taken in the golden hour around sunset -  and around november time when the sunset is in the right place behind the trees - from what I can gather from www.suncalc.net anyway!)

Now I was in the area on a summer day with clear blue skies - so my photos were going to be of a different mood! But i done this walk not with the aim of taking some great moody photos - but just more to enjoy a walk in the sun, scope the place out and see exactly what it was like up there! With the aim to one day return when I have more time on my hands.


For the photographers out there looking for info on Twistleton Scar, trees and rock formations:

For the photographers searching the web looking for info on Twistleton Scar and who come across this blog - i would recommend doing a similar walk - as you can park quite near the sumit of Twistleton Scar End - get up there quickly and take your photos (it seems the best, most weathered and windied trees are right on the edge of Twistleton Scar End as you get onto it from the direction I took).

The quick walk up Twistleton Scar:

I'd looked on the map for the best, closest place to park my car to approach Twistleton Scar and headed up from Ingleton a single track road called Oddies Lane and then onto the Roman Road. Now there is not much space to park on this road - maybe space for a few cars on the grass verge - so just hope you get lucky! See map below where I parked (Near where it says Beezleys).

map of quick twistleton scar walk, ingleton, yorkshire dales


From my parking spot it was simply through the gate and about 500m along a well marked path up to twistleton scar end! Straight away at the edge of the scar you notice the weathered limestone pavement rock formations and the odd withered tree uniquely shaped by the wind scattered around and perched on rock edges. These trees and unique rock patterns are what the photographers come for - so I got my camera out and just wondered around the immediate area getting a feel for the place. Twistleton Scar is in-itself quite a big area - and there is a lot to explore so I would love to come back here and do a much longer walk right across the scar - and recommend it to others as this area is a unique and beautiful place.

Now for some photos documenting my Twistleton Scar Walk:


You can see the start of Twistleton Scar end from my parking spot - although the path does snake round a bit and its not straight up.

There you go - Twistleton Scar end is 1/4 mile walk!


twistleton scar end walk, ingleton, yorkshire dales


twistleton scar end tree, ingleton, yorkshire dales
The first trees you come across - and maybe the most wind weathered ones!

twistleton scar end tree, ingleton, yorkshire dales


twistleton scar end, ingleton, yorkshire dales


So there you go, some photos documenting my quick walk up Twistleton Scar End. I'm looking forward to visiting the area again in future in different conditions when the (bad!) weather gives it a whole new atmosphere - and with this route it means I can do it quite quickly if the weather happens to be freezing and raining! 

Anyway - hopefully this blog post will prove useful to others in planning a trip to Twistleton Scar - and if it does inspire you to visit the place - and you take some pics - post a comment and send some links - it would be great to see the different conditions and compositions people come up with :)

Cheers, Stuart


Hackfall Woods Walk. A woodland walk in North Yorkshire

$
0
0

A walk around historic Hackfall Woods. Woodland walks in North Yorkshire, near Masham, Leyburn, Bedale& Ripon


Some of my photo highlights from one of Northern Englands most historic, beautiful and intriguing woodland walks, loved also by Wordsworth & Turner!


cascading waterfalls in hackfall woods
Lush foliage surrounding cascading waterfalls in Hackfall Wood


Best Woodland Walk?

I came across the Hackfall Woodland walk in an article on the Guardian website called 'Readers Best Woodland Walks' - and Hackfall Woods was the winning tip - so thinking it must be a good!, I made a note of it to visit at some point, as I live in Hartlepool (North-East England) (not too far away - about 1hr 15min drive to Hackfall) and I'm always looking for new walks and places to visit in the area


Here's the winning description from that Guardian article:
"Hackfall Wood is deep in a ravine with a churning river at the bottom. What makes it different are the follies that were dotted around the landscape by William Aislabie, son of the creator of the nearby Fountains Abbey garden, in the 18th century. They have just been restored – but only partly, which leaves the place with an air of mystery so that it feels like you're discovering it for the first time. At twilight on an autumn day it's magical"
http://www.guardian.co.uk/travel/2010/oct/15/woodland-walks-readers-tips

view towards the Vale of York
Hackfall Wood is in a deep ravine - with the River Ure cutting straight through it


Go there!

Having now visited the place - I highly recommend it as place to enjoy a short wander around, which can be done in around an hour or longer if you chose to explore more of the pathways and stop off at the various follies and interest points. I would imagine it's also a great place to take children as there are lots of things to keep them interested and I guess the place would seem a little magical to them - and probably more so if you have a good imagination to explain all the follies, ruins and castle! I guess you could even stretch the walk out a lot further if you choose to walk to it from Masham along the river. 

Masham incidentally would make a good place to grab a bite to eat and maybe a cheeky beer as there are a few pubs in the village (a brewery if you fancy more than one beer :-) and even some local craft/antique shops to pop into. Check out www.visitmasham.com for more info.


Useful Hackfall Wood Information:

You can find out a lot more about hackfall wood on this link www.hackfall.org.uk

Map, Routes and Leaflets: There are printed leaflets with maps of the walking routes and points of interest in the small car park for Hackfall Wood - which are a great idea and very useful. The leaflet has 4 ideas for different walking routes - short/easy/flat to more longer ones with climbs. The leaflet can also be viewed as a pdf here www.woodlandtrust.org.uk/en/our-woods/hackfall/documents/hackfall-walks.pdf with the actual map from the leaflet below:

hackfall wood, leaflet, map, route, walks
The map from the Hackfall Wood leaflet produced by the Woodland Trust, copies of which are in the hackfall car park.

Some photos documenting my walk around Hackfall Wood:

hack fall wood car park
The car park is easily found on the road south from Masham to Grewelthorpe


Really useful info point and even some free leaflets to plan your walk


Here you have the choice to go straight on through the gate and down the field to Limehouse Hill and the Sandbed Hut - or to see the views from Lovers Leap and the Rustic temple - go right on the path which is in the bottom right of this photo.
No much of a view from Limehouse hill in Summer when all the leaves are on the trees!

beach on the River Ure!
First glimpse of the Sandbed Hut

beach on the River Ure!
Didn't think I would be sitting in the sun on a beach today!


The Grotto for a little sit down if you need it

Glimpse of Forty Foot Fall


The Grotto as you approach the Fountain Pond

hack fall wood, fountain
The fountain on the pond - which apparently comes on every 15 minutes.
You can just about see the Ruin up above overlooking the fountain.

Child friendly seating!

Fishers Hall


I wasn't aware that there would be so much water flowing through Hackfall Wood - and Grewelthorpe Beck was a cracking place to delve down into and take some photographs of its cascading waterfalls and lush foliage. The beck wasn't the most accessible part of the walk though and did result in some very muddy and wet boots! Worth it though as I think the photos above and below are my favourite shots from the walk and I'll be whacking these on the photography section of my web-site at www.stuart-hodgson.com/experience-nature.html


Mowbray Castle

The stepping stones crossing to Alum Spring
Waterfall at Alum Springs

Alum Spring - beautiful unique place - it didn't seem real


The Ruin

hack fall wood, vale of york, view, walk
Fantastic views from the ruin over towards the Vale of York

More Great views can be seen from Lovers Leap

That wraps that walk up - hope you found the blog post interesting & useful and decide to visit Hackfall Woods yourself - trust me it will make a great day out for a walk. I'll be planning to come back in the autumn when the rusty leaves on the trees give the place a different atmosphere.


Cheers 


Useful Hackfall Woods Links:


Hackfall Woods: You can find out a lot more about hackfall wood on this link www.hackfall.org.uk

Woodland Trust: Information on hackfall woods can be found here http://www.woodlandtrust.org.uk


Other local walks & places of interest:

Studley Royal

The Aislabie Walk: This is a website which has a number of walks which take you through Hackfall, but also onto other places like Studley Royal www.aislabiewalk.org.uk/

Fountains Abbey & Studley Royal: A World Heritage Site, Fountains Abbey & Studley Royal is a huge estate of beauty, contrasts and surprises including the largest abbey ruins in the country and one of England’s most spectacular Georgian water gardens. www.fountainsabbey.org.uk/


Newcastle Gateshead Quayside

$
0
0

newcastle quayside gateshead best photo sunset sage millenium bridge tynebridge
The evening sun over the Newcastle & Gateshead quayside from Baltic


Newcastle & Gateshead Quayside


The view down the quayside from the Milenium Bridge towards the tyne bridge is one of my favourite north-east views. We often drive up and park at the car park at the Sage Gateshead and make the short walk over the Millenium Bridge for a drink on the quayside. On this occasion the setting sun was producing a nice warm glow and made for a good picture!


Angel of the North


As well as the quayside - the Angel of the North is also a popular haunt of photographers - and here is a couple of pics from my stop off!


A wander around The Alhambra

$
0
0

Photos of the Alhambra Palace in Granada, Andalucia, Southern Spain


This blog post is a little different to the others on here - being that it's not a walk as such and it's all about architectural beauty rather than the beauty of the natural world. Nonetheless, I wanted to post the pics I took on here, as it was a truly stunning place, a wonder of the world.

The alhambra palace
The level of detail throughout The Alhambra is truly amazing,
it's got to be one of the most astounding pieces of architecture on the planet!


I maybe haven't been in awe of a building as much as I was with the Alhambra. It had that same breath taking brilliance as I get, say, when looking at a magnificent landscape. I guess what was so spectacular about it was the level of detail on the walls inside the palace, and this detail is carried on through section after section of the palace. The gardens are excellent too, and lots of features are made of the running water that passes through the palace, which flows naturally from way up high in the surrounding Sierra Nevada mountains. The creators of this place have also used the water and gardens to create micro-climates around the Alhambra, so you can escape the heat of the Spanish sun. All in all - there seems to be perfect harmony between the man-made and nature, and I guess this comes from the original Moorish vision to create something which resembles heaven on earth.

From a distance the Alhambra is hidden amongst the trees - and is quite basic on the outside - with no indication of what is to be found inside.


The Alhambra consists of gardens, courtyards, outhouses, pools, rooms, hidden gyms, and there are surprises around every corner. You see something amazing, and then see something even more astounding around the next corner.


I won't go too much into the layout of the alhambra, or the history and meaning - as that can be found elsewhere online. All I will do is post the pictures I took on my trip around the palace - which hopefully get across the fascination I had with the Alhambra. If you are ever on holiday on the South Coast of Spain - try and book a day trip to see this amazing building - you won't be dissappointed.


Wild Camping at Hard Tarn, below Nethermost Pike, near Helvellyn, Lake District

$
0
0
Wild Camping at Hard Tarn, Lake District

Some photo highlights from my Hard Tarn Wild Camping trip:

Wild Camping at hard tarn, lake district. Sunrise from Nethermost Pike looking east to Patterdale, Ullswater and the Pennines.
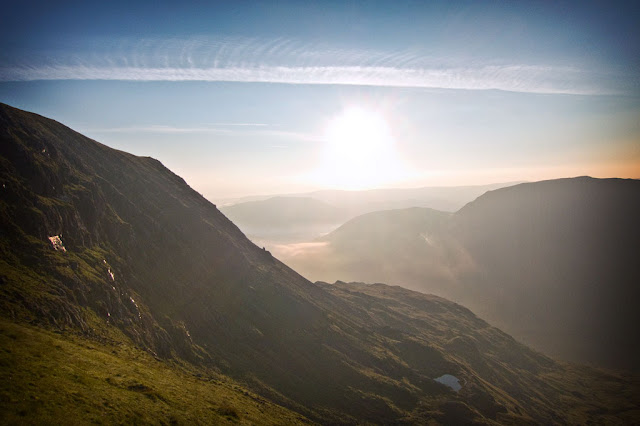
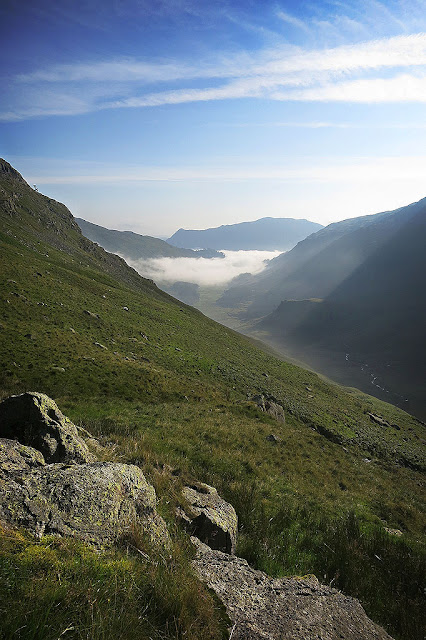
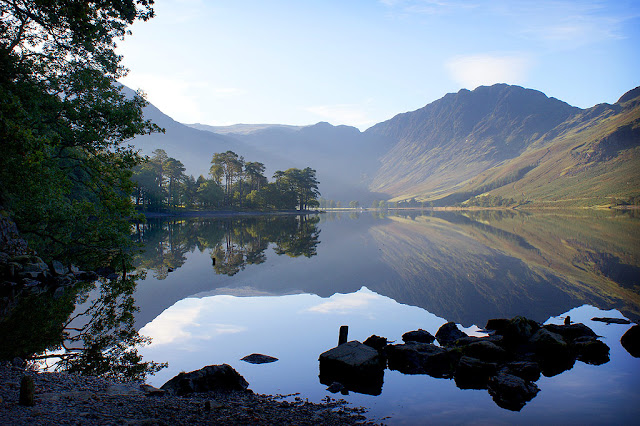
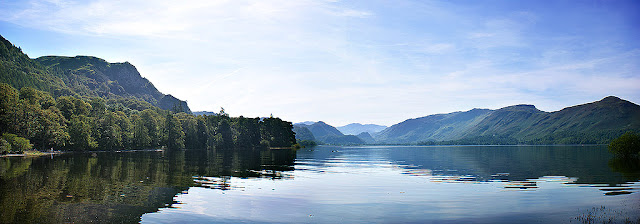
Sunrise from Nethermost Pike looking east to Patterdale and Ullswater where the mist is and the Pennines in the far distance.

Wild camping at Hard Tarn, Lake District, near Helvellyn.
Wild camping at Hard Tarn in the lake District, with High Craggs in the background.


I've come across some awe-some photos recently of sunrises, sunsets and inversions - and it has now been put on my bucket list to see a sunrise over an inversion. I know you can't really plan these things - but I thought this year I would make the effort and do a wild camp on a high peak and try and witness a sunrise. I'd done a few wild camps in the Lakes many years ago - but none in places where you can see the sun rise over a valley - so this was to be my first Wild Camp to try and see such a thing. Writing now, after the trip - although a bit of a slog to get there - it was well worth the effort as you get to see and experience things on another level that a regular day walker just wouldn't get to see - I'll definitely be planning more wild camps in future and really recommend others to do the same.

As for this trip - it was a friend of mine had come across the Hard Tarn location for a wild camp by browsing around on the web and coming across links such as this hard tarn wild camp. It sounded a good little remote spot - tarns do usually seem appealing for a place to stop - and from previous walking experience in these parts - I knew from the mountain range above (High Craggs / Nethermost Pike / Helvellyn) you can get a good view east - so a good place for a sunrise. So the location was set - I just needed some decent weather - and after waiting most of the summer for good warm weather, relatively clear skies and a space in my diary - the time come on 10th August 2012.

The map route to Hard Tarn, Wild Camping in the Lake District
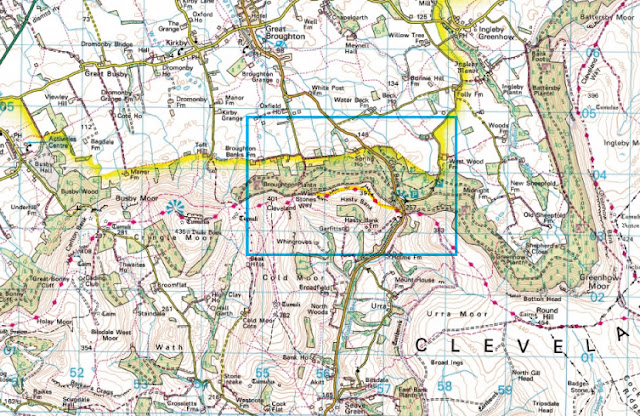
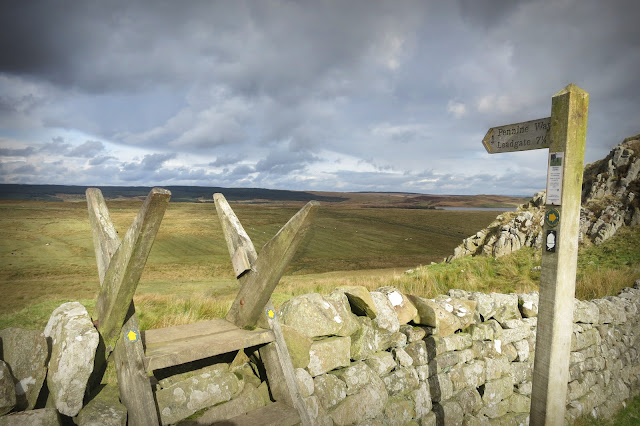
The route (highlighted yellow) to Hard Tarn, up through Grisedale Valley then off the beaten track at Ruthwaite Lodge


DAY – The walking route to Hard Tarn:

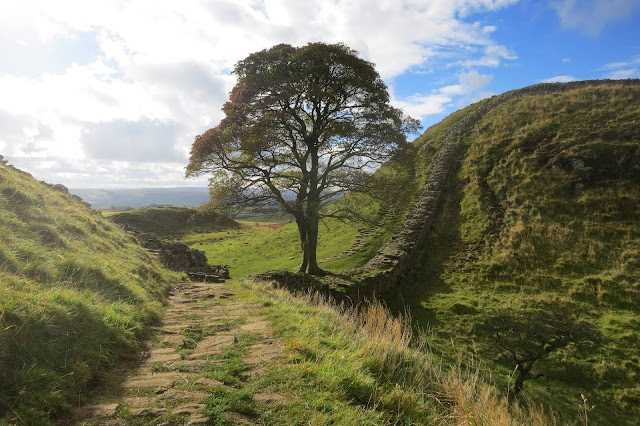
I'd walked these parts a few times before - so knew the route up to Grisedale Valley from Patterdale well - and had stopped at Ruthwaite Lodge a few times for a bite to eat as you get a superb view down the valley from it's elevated position. However once you get to the lodge along the well-marked path - it's a case of going off the beaten track- making your own path and following the river and cascading waterfalls up towards Hard Tarn - and using a map, the surrounding mountains (and an iPhone GPS as fall back plan) as your guide.

The path up Grisedale Valley towards Ruthwaite Lodge. You can make out the peaks of Dollywagon Pike to the left and Nethermost Pike just off centre to the right (where we would see the sunrise from!)


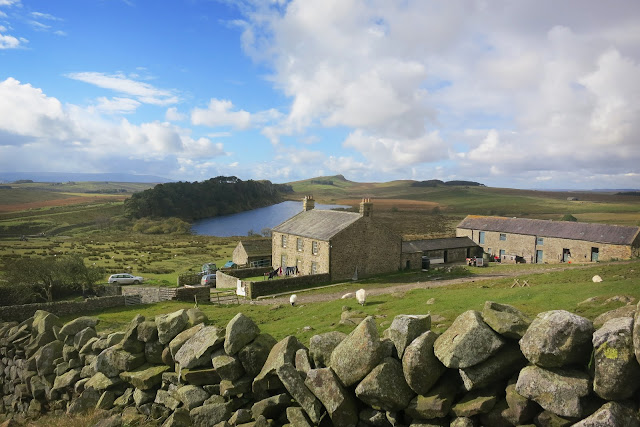
Ruthwaite lodge - we will be heading up to the heights behind it.


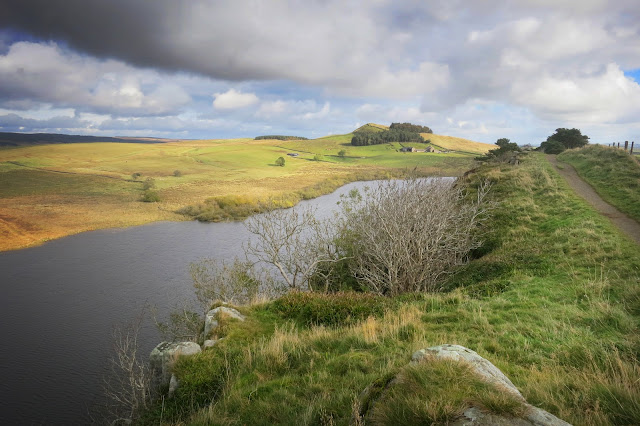
It's a good idea to stay close to the stream to use as your guide as it eventually leads to Hard Tarn if you follow the right one. The stream also makes a good place to have a wash in the morning :-)


The difficult thing about Hard Tarn is going up this way - you can't actually see it until you are level with it. A few times I had doubted that we were heading in the right direction - but just kept walking in good faith that we would stumble across it if we kept heading in the right direction - using the peaks of High Craggs and Nethermost Pike as a guide and also staying close to the stream that also headed in this direction.

location of Hard Tarn using the surrounding mountain range as the guide
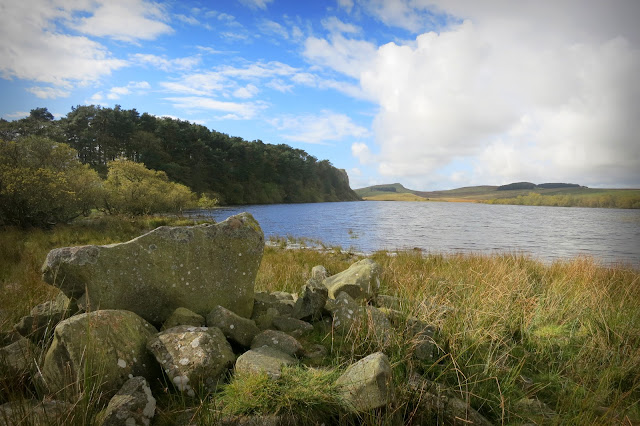
The location of Hard Tarn using the surrounding mountain range as a guide. Keep High Cragg to your left - Nethermost Pike to your right - and follow the stream and you will get there, eventually :-)


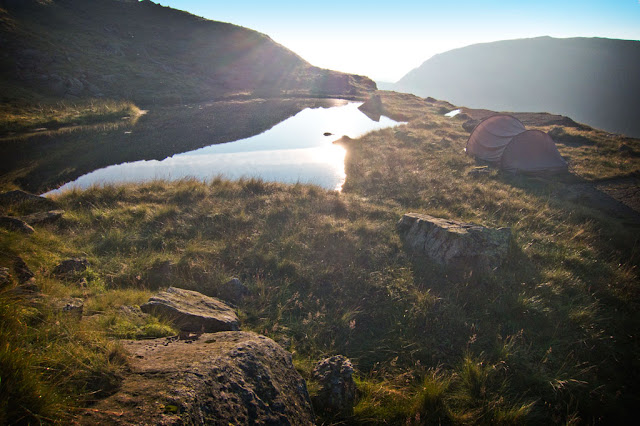
After a longer, steeper and higher than anticipated walk (it had been a while since I had walked with a big back pack on!) - Hard Tarn appeared. It proved to be a perfect little spot to pitch a tent - with a bit of flat space that wasn't boggy - and also some flat level rock face to sit on for when the grass is a little damp in the morning. It may not be the most accessible tarn in the area - but that can be considered a good thing - as then there is a good chance that you will get the space to yourself!

perfect spot for a wild camp - my tent pitched next to Hard tarn, Lake District
A perfect spot for a wild camp - my tent pitched next to Hard Tarn, Lake District

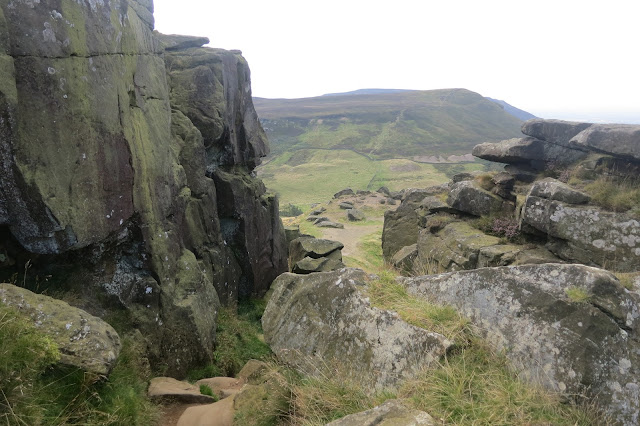
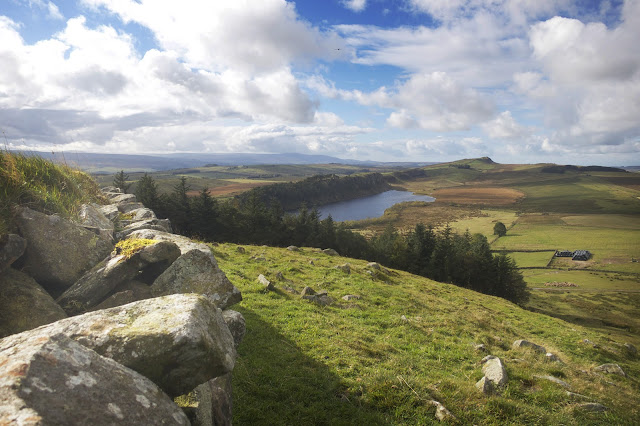
To the far left of this picture - you can see the path leading up to sumit of the Mountain Range (in between High Crags/Nethermost Pike) - which is the route we took to get as high as poss to witness the sunset and sunrise. It's not an official path - but just about manageable, although a bit steep.


A perfect spot for a wild camp - my tent pitched next to Hard Tarn, Lake District Stunning views of the surrounding Lake District mountain range from Hard Tarn
Stunning views of the surrounding Lake District mountain range from Hard Tarn wild camp. A great place to get away from it all.

EVENING – The fading light & sunset:

Here a few pics taken around the Hard Tarn area as the sunlight was fading.

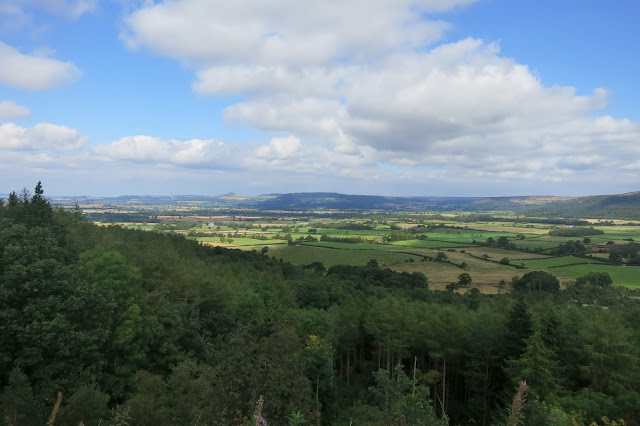
Looking down Grisedale Valley as the last drops of sunlight reach the distant peaks.

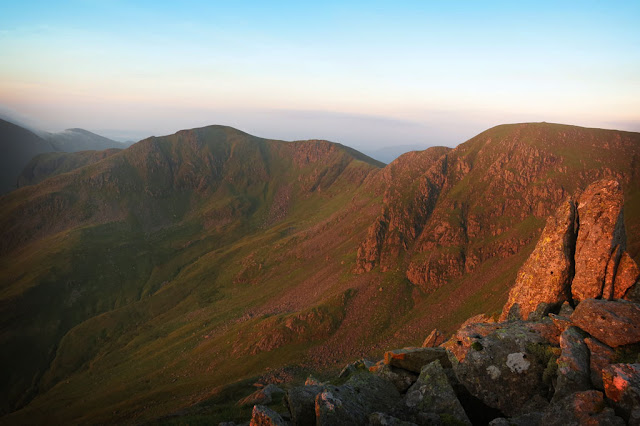
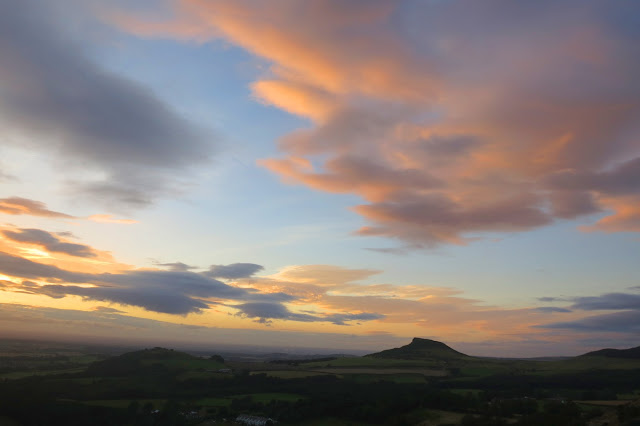
Nice warm glow on these peaks from the setting sun.

You get a really good view of St.Sunday Crag from Hard Tarn.

A sunset from the top of the Nethermost Pike Range - in the distance you can see the Solway Firth and Bassenthwaite lake I think.


NIGHT – The Stary Sky & Milky Way

This was a bit of a bonus - I thought we might get to see some stars as the forcast was for a clear night. I'd been in the Lake District before when there had been clear nights and I'd never seen so many stars - but this was something else. Not a cloud in the sky - no light pollution whatsoever, and a wide expansive view of the sky. You could actually see a faint mist running right through the centre of the sky - which I knew to be the Milky Way Galaxy - it was absolutely spell-binding and an amazing sight.  It was one of those sights that just took your breath away. And there is just something about seeing a night sky like this with thousands of stars in it that really make you think and get all philosophical - realising what a very special planet we live on and how lucky we are to be here now.

To top it off there seemed to be lots of shooting stars around - and I have since later found that weekend was when the perseid meteor shower hit earth's atmosphere - apparently the year's most spectacular meteor shower for viewers in the northern hemisphere! Another bonus. With the warm night we ended up just bringing the sleeping bag & matts outside, putting some music on the speakers and just soak it all up - knowing it's not often you get chance to see such a sight.

This isn't actually my photo - I found it on the web after searching around for something that represented what you could actually see with the naked eye. You could actually see the Milky Way galaxy across the centre of the sky in a sort of faint white mist - it was absolutely awe-some in the truest sense of the word.  
Just as a side note - the sight of a night sky with the most stars I had ever witnessed reminded me, and brought home to me the significance/magnificance of a short clip I had recently seen on youtube - entitled - 'the most astounding fact' - its well worth checking out, link below if you have a few minutes - its one of the most powerful & moving short films I've yet seen in a sort of 'my place in the universe' sort of way:


SUNRISE – a new dawn

As people who know me will tell you - I do like a sleep in in the morning :-) I'm not normally one to rise with the birds - but with the anticipation of seeing a glorious sunrise - it was easy to wake at 5am in the morning - and well worth it.

It was a bit of a scramble to get upto Nethrrmost Pike - but it proved to be an excellent vantage point to see the sun rise. There was even a bit of mist in the low valley - so perfect conditions :-)

Sunrise from Nethermost pike


Sunrise from Nethermost pike
Incase you think I'm making this all up :-)

A warm glow lighting up striding edge and the Helvellyn range, sunrise, wild camp
A warm glow lighting up striding edge and the Helvellyn range

This time looking towards Dollywagon Pike

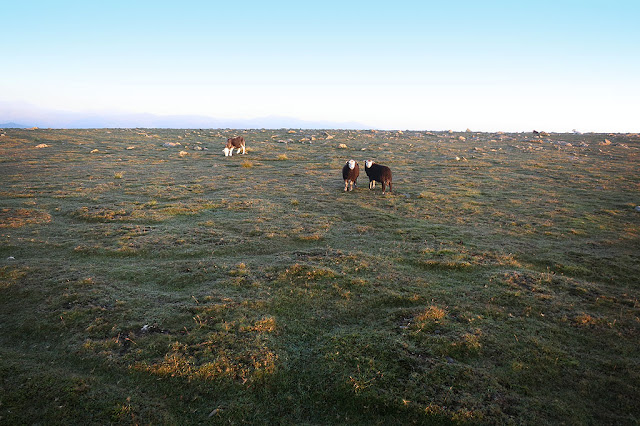
As it was around 6am by this time - these fellas were the only ones up there with us!

BACK TO CAMP & Grisedale Valley

As we were up at 5am - we were heading back to the tent quite early and were all packed up for about 6.30am!


A new dawn dawns at Hard Tarn and it's time to move on from our wild camping spot.

As we headed back down to Civilisation and down Grisedale Valley - the mist seemed to be hanging around the patterdale area- and althoygh maybe no more than 50m high - the mist did make you feel like you where higher than you actually where. I guess for those who were actually in patterdale
 - all you had to do was climb a little out of the place and you would be out of the mist. It's something I will look to do if I'm ever staying in Glenridding/Patterdale - an easy way to be above the clouds!


Well there you go - another blog post wrapped up and an absolutely brilliant experience. I'd definietly recommend a wild camping trip to others - just make sure you plan the location right, pick a time when the weather is favourable to what you want to see, you know where you are going and you take the right equipment. I'm no wilderness camping expert so read up as much as you can - but if you have any questions - feel free to post any comments and I'll try and help!


Cheers 
www.stuart-hodgson.com


wild camping equipment list, lake district


Wild Camp Equipment List & Tips

This was my first Wild Camp in years, and my most extreme to date, and I'll be looking to improve my equipment list in future as I plan to do more wild camps now. I'm not an expert - but for those new to Wild Camping here is a basic list of what i took - and a few tips:

Wild camping Basics:

• Decent back-pack - to carry all your stuff - mine was 80litres
• Tent - the lightweight the better - you've got to carry this! Do your research and get the best you can afford
• Sleeping mat (inflating) - you need something comfortable to sleep on and separate you from the cold ground. If you don't have a decent matt - you will be a lot colder on the night. Mine was lightweight and folded quite small - useful when space in your bag is limited.
• Sleeping bag - again lightweight - but also a tog rating suitable to the temperature conditions. You get what you pay for with these things.
• Inflating pillow - a pillow is essential for me to get a good nights kip! I'm looking into better options lol

Other essentials:

• Good  Torch - more than one - and spare batteries - it gets really dark up there and with no torch - it can be dangerous - especially when making way back to tent after seeing a sunrise
• Insect repellent - where there is water - there are flies. This will make your trip more enjoyable by keeping  the flies away.

Clothing:

• Take warm additional clothing - it may be warm and sunny in the day time - but can get cold at night - better safe than sorry
• Take thermals to sleep in - its better to be able to take clothes off at night if you are too warm - than be freezing your arse off wishing you had took them!
• Take spare walking socks and flip flops -thsi is one thing I wish I took - as my feet got a bit wet on the climb to Hard Tarn - so socks were soaking and it would have been useful to have some flip flops for around the tent. Wasn't nice having to put back on wet socks and shoes in the morning.


Food & Water:

As we only went for a night - we made sure we had food in our belly before going up, and promised ourselves a full-english breakfast when we got back down. So we just took some basic snacks that didn't need heating or a stove to snack on - usual stuff: flap jacks, cereal bars, nuts, fruit, sandwiches.
• I will though be looking to invest in a decent small stove for next time so I can make a cup of tea in the morning and maybe have some warm food - it just makes it a more comfortable experience :-)
• Water is a key one as ever - take as much as you can carry - 1 litre done me for the 9 hours we were up there - although I could have done with 2 litres as I was a bit thirsty when I got back to the car

And last but not least, for me anyway and essential is my camera, so I can record my memories and share my trips with others :-)


Roseberry Topping Walk at Sunset

$
0
0

An evening sunset glow over Roseberry Topping from Cockshaw Hill Quarry

Roseberry Topping sunset, from Cockshaw hill quarry, near Captain Cook's monument, teesside
An evening glow over Roseberry Topping, from Cockshaw Hill Quarry, near Captain Cook's monument.


For anyone who lives where I do (North-East England) if you have a passion for walking - it probably first started off as a kid by climbing Roseberry Topping. It can be seen from miles around - a kind of shark fin shape on otherwise non-descript rolling distant hills, and calls out to be climbed, although it isn't actually that high - the views of the Tees Valley are pretty good on a clear day.

Although I'd been to Roseberry Topping quite a few times - I went in search of a good photo composition of it with a setting sun in the background. This was my first attempt at getting a decent location from which to take a photo, and I'll be going back to try out other locations. You can see some wild flowering heather in the forground - and their is plenty of this pink carpet all over the North-York moors this time of year. 

Below is another slightly different shot from the same place, I just wanted to capture the warm sunlight and try and get some heather in the shot too. At the moment of posting this blog, the day after the photograph was taken - I'm not sure which image I prefer, I'll revisit in a few weeks and see if I have a favourite.

An evening sunset glow over Roseberry Topping, from Cockshaw Hill Quarry, near Captain Cook's monument.
An evening glow over Roseberry Topping, from Cockshaw Hill Quarry, near Captain Cook's monument.

Perfect location for sunset seekers!

You get such a good view from up near Roseberry Topping that it's a cracking place to watch the sun go down, here is a few more abstract shots of the sky as it turns different colours.


A Roseberry Topping walk from Great Ayton via Captain Cooks monument


For anyone interested in doing a walk in this area - the below is the classic route, taken from the walking englishman website. Starting from Great Ayton - heading towards Roseberry Topping - from there you head along the moors to captain cooks monument and then back to Great Ayton. It's a 7 mile walk- which can be done in 2-3hours.

Roseberry Topping walk from Great Ayton, then onto Captain Cooks monument and back to Great Ayton!


Ben Nevis Walk & Glencoe, Highlands, Scotland

$
0
0

A challenging walk (beginners/tourist route) to the top of the UK's highest peak, the mighty Ben Nevis in Scotland. Topped off with a superb drive through Glencoe 

3 sisters of Glencoe, walk, Highlands, Scotland
The 3 Sisters of Glencoe in Scotland. My fave pic from this weekend trip. The road runs right down this valley.


Myself and a few mates had been wanting to climb Ben Nevis for a while, we'd done the highest peaks in the lakes, this was the next one we had to do. Being the highest peak in Britain, and throw a bit of male/walking ego into the mix - then it's got to be on your list hasn't it. We'd been rained off earlier in the year and had to cancel our trip, and by the time September came, it was our last chance of the year really - so we just went for it.....

The forecast for the weekend was mixed, with rain due, and snow on the way, so we crossed our fingers, packed the waterproofs, and took off on the 6 hour car journey to Fort William. It was not a journey I was looking forward too really, I get itchy feet when in the car too long, but after the 3+ hours it took to get to Glasgow, the rest of the drive flew by, probably because of the awesome wilderness scenery around every bend. Infact the last 2 hours was definitely one of the best surroundings I've drove in, with Glencoe being a big highlight, and the sight of the 3 sisters being something to behold.

I just had to stop the car and take a few pics here (best pic above), with the brooding weather and grey clouds seeming to fit perfectly with the rugged mountain scape. We agreed that we would return to Glencoe another time to do some walking, and I quite fancy doing a wild camp in the Lost Valley of Glencoe - seems like a canny adventure (google it if you haven't come across it...) Anyways, onto the walk....


The Ben over Fort William:

This is not my photo - but I wanted to show (and see!)  a complete view of Ben Nevis towering over Fort William as unfortuntaley you couldn't see the top of Ben Nevis when I was there! www.dunlachlan.co.uk


We arrived in Fort William on the friday tea-time - with drizzle in the air. After checking into Westcourt b&b which i would highly-recommend (see bottom of page)- we headed out into town for a bit to eat and a couple of pints (note, 'couple' - we didn't want to feel too groggy the next day) so it was a case of an earlyish night on the friday - in preparation for the next days walk. We woke on the saturday to dry skies and a full scottish breakfast (after sampling it - haggis was not my cup of tea). Fortunately the days forecast was to remain dry - although the peaks would be covered in cloud. Slightly disappointing - although couldn't complain really as it was bucketing down on the sunday - so we got the best day of weekend for the walk. I would love to come back and do the Ben on a clear day - but I read that on 9 out of 10 days you can't see off the top of it......so got to be lucky with that one.

Anyways - bags where packed, stocked up with food, and we headed off in the car a couple of miles to Glen Nevis visitors centre. We were considering walking the lot from the B&B - but when we were coming back down from the summit - we knew it was a wise move to shave a few miles off the end of the walk :-)


The Ben Nevis Walk:

MILES: 10.3
TIME TAKEN: 6.10 hours

Because this was our first venture to Ben Nevis, and not really knowing what to expect and the weather a little mixed, we stuck to the usual 'tourist' route that I guess most summit walkers take. This route is up and down the same way:

ben nevis route map
Original map from here


Start of the Ben Nevis walk from the Glen Nevis visitors centre, peaks covered in cloud :-( It costs £3 to park in the car park all day - and I would recommend it - as we didn't fancy walking much further than the car park at the end of the Ben walk :-)


The title of this post was 'a challenging walk (beginners/tourist route)'. I put beginners in there because - you can, effectively, do this walk with no map reading skills whatsoever as the path is clearly defined all the way to the top, and there is no scrambling involving your hands - just very steep rocky steps for most of the way! Lots of people do this walk on most days during the warmer months, and you can just follow everybody else. This was the busiest walk I've ever done, some would say too busy, but I found it a nice change, and quite inspiring to see lots of people, men & women (and kids), from the very young to the very old doing the walk (lots even doing it for charity). There was even a triathalon event on when I done this walk - with the running part being to run to the summit and back! Rather them than me....

I did also put challenging in there too though, as whilst the route was clearly defined - it was still hard. The full walk took us around 6 hours (with maybe an hour for stops here and there). It took us about 3.5 hours to get to the top - and this was like climbing stairs for 3.5 hours! I felt the same (in terms of quite knackered!) at half way on ben nevis as i usually do when I have climbed to the summit of scafell pike or hellvellyn. Maybe because you are practically climbing the full 4,409 feet from sea-level at ben nevis, whereas in the lakes you are normally given a head start of a few hundred feet and the summits aren't as high. As I type this (4 days after the Ben climb) I can still feel tightness in my calf muscles! The day after the walk my full body felt like wood – and i would consider myself generally quite fit, just not used to walking up steps for 3+ hours then coming back down them! So be warned....you need to be quite fit to do the Ben - and still you will feel it in your legs for a few days after! Worth it though :-)


Crossing the River Nevis over the suspension bridge from the car park to begin the route

Initial route passes right by the Ben Nevis Inn - another decent place to park - and the perfect place to stop when you come back down for a drink, food & warmth :-)

There was the odd burst of sunlight poking through the clouds - but i wasn't expecting the skies to magically clear. I guess the grey skies kind of suit this rugged scottish landscape anyway... 

It's pretty much like this for 2+ hours - quite steep!


We took what is called the Pony Route - which has clearly marked paths and you hardly even need a map - just follow everyone else! I've never been on a walk where it was this busy. In some ways good to see others doing it - you kind of push each other on - although if you want a walk where you want to get away from it all - then try a different route!

Red Burn - which we would cross later on


It was an effort to get here to Loch  Meall an t- Suidhe, and this just about represents the half way mark!

Me looking a bit of a muppet! I was quite warm on the way up, but it was really windy, the Buff came in useful as a headband to cover my ears :P


Crossing red burn

Looking way back down to the Glen Nevis campsite, feeling quite high up now...


It's now a case of about 8 zig zagg paths to the summit


Going into the cloud line now....visability becoming a bit of an issue...
A bit of clearing which gives you a bit of an idea of how high up you are. Apparently some climbers come up this way - looked a bit hairy to me


The above photo is where my camera decided to run out of battery life, there wasn't much else to photograph from this point anyway - apart from misty skies and a pics on the summit. Time to switch to my camera phone....

Magnificent views from Britains highest summit :-P


Officially the highest person on land in the United Kingdom :-) For 30 seconds or so anyway....


Remote holiday home.....you can actually go inside this - guess its for those people who get into difficulties or arrive on the summit in treacherous conditions.

After a stop on the summit for some food of about 20 mins or so, the cold was starting to bite, as it must have been minus temperatures with the wind chill. So it was a case of put every piece of clothing I had on - and make the treck back down the same route..

Back down....

We stopped here at the Ben Nevis Inn when we got back down - perfect place to sit down, rest the legs and get a drink in warm cosy surroundings :-)


Check the weather forecast before you set off


Photos from others of Ben Nevis: 

(found on the internet-source links provided)


As we couldn't actually see off the top of Ben Nevis on our visit - I searched around on t'internet for teh sights we never got to see. Here are a few I found, hope you get lucky if you decide to walk the Ben...


This is what the summit actually looks like. It's hard to imagine the steep drop from the summit when you can't see 10 feet in front of you.
View of the North face of Ben Nevis
Wow! View east from summit of ben nevis


Well there you go, that wraps up my post on my Ben Nevis Walk, hope you find it useful if you decide to tackle it, and I hope you get lucky with the weather. Whilst it was physically the hardest walk I've done, haven't ached for days after a walk like that before, it was also really enjoyable, a great challenge, and you get a big sense of achievement to have conquered Britains highest peak. Next year we'll be off to Snowdonia, and I wouldn't then rule out doing the UK's 3 peaks in 24 hours....


happy walking,
www.stuart-hodgson.com


ps. here is a couple of more pics from my weekender worth including on this page...

Stop off to admire the 3 sisters, Glencoe, Scotland

I just had to stop the car and take a few pics here, with the brooding weather and grey clouds seeming to fit perfectly with the rugged mountain scape. We agreed that we would return to Glencoe another time to do some walking, and I quite fancy doing a wild camp in the Lost Valley of Glencoe - seems like a canny adventure (google it if you haven't come across it...) Anyways, onto the walk....


Stop off at Loch Lomond

I knew we would be driving past Loch Lomond - so I quickly googled somewhere where we could briefly stop off and get a decent view of the Loch. Duck Bay was where we stopped for 5 mins - and a rainbow decided to show itself...

Rainbow over Loch Lomond from Duck Bay


Extra Info on Ben Nevis trip

My mate booked the B&B, and for a lads weekend, a comfortable bed was all I wanted really. But he came up trumps and found Westcourt B&B. Honestly one of the most friendly and nicely decorated/furnished B&B's I've ever stayed in. More suited to a romantic weekend away than a lads weekend away. Highly recommend it (I wouldn't just plug anything on my blog...)

Westcourt B&Bwww.westcourt-fortwilliam.co.uk


We stayed 2 nights in Fort William and went out fro two meals - first night we had food in the Tavern - second night we went to the Cafe Mango indian/thai restaurant - both recommended - and both easy to find on Fort William high street. Also there are lots of pubs/restaurants on Fort William high street to cater to every taste.


More blog posts on Ben Nevis

This is a good read, bit of snow on top when this walk was done, an illustration of the changing conditions and the dangers of snow and cornices on top! www.sharkeysdream.walkingplaces.co.uk/

The Wainstones Walk, Cleveland Way, Bilsdale, North York Moors

$
0
0

A walk on the Cleveland Way to the Wainstones in Bilsdale, North York Moors

Walking on the Cleveland Way to the Wainstones, North York Moors


With a couple of hours spare on a sunny afternoon, and a catch up with a mate on the cards, it seemed the perfect time to do our first walk to the Wainstones, a rather unusual (for the North-York Moors) rocky out crop. I'd heard it was a good, relatively easy local walk, and would also make for some good pictures. I'd seen some stunning sunset pictures from the Wainstones, so this would be a good time to familiarise myself with them. Also the heather was in full bloom - it was a sunny day, so perfect conditions. 


The Wainstones themselves are a prominent feature at the western end of Hasty Bank, and overlook the quaint village of Great Broughton (by the way - if you fancy some food or a pint in this area - check out the Bay Horse pub in Great Broughton - you can't miss it as you drive through it). The Wainstones are quite well-known in the area, and are popular with walkers, climbers & photographers a like. 

For a bit of history, the name "Wainstones" may have been used to represent a "Wain" or "Wagon" which the stones may have looked like at one time.  However local legend also says a Danish Chieftain was slain there. If this is the case, then the name 'Wainstones' may have come from the Saxon verb 'Wanian' meaning to lament or grieve. I think the latter is a more fascinating account - so I'd like to think that one is true :-)

Start of the Wainstones Walk:

The best place to start this Walk is from Clay Bank Car Park (free to park), from which you can easily get onto the Cleveland way and head up Hasty Bank. To get to the car park - head for Stokesley & then Great Broughton. Clay Bank Car Park is 2 miles south of Great Broughton on the B1257 Stokesley to Helmsley Road. (By the way - it's also a great Countryside drive if you continue right on to Helmsley). Right at the Car Park - it itself has a superb view towards Roseberry Topping, Below.


Start of the Cleveland Way path, just off the road, near Clay Bank Car Park, which leads you up Hasty Bank. After a 10 minute walk up hill, the path then completely levels out on top of the Moors, from which you can quite easily walk to the Wainstones.

It doesn't take long to get up on the Moors. This shot is looking back over the full Cleveland Way which stretches right into the distance

The carpet of flowing heather is a spectacular sight on the North York Moors
The carpet of flowering heather is a spectacular sight on the North York Moors


Walking on the Cleveland Way to the Wainstones, North York Moors

You can just about make out Roseberry Topping in the distance


On top of the North York Moors heading to the Wainstones in the direction of Carlton Bank

The Wainstones:


First glimpse of the Wainstones looking west


Looking south towards bilsdale

I'd seen a superb sunset photo in this composition on the internet, with the evening glow of the sun illuminating the surrounding rock. I believe the sun sets right in the middle of this composition around march/october time. I'll maybe come back.....

Looking east towards Roseberry Topping


I'm hoping to revisit this particular scene late one evening to capture a sunset behind silhouetted the Wainstones
I am the Walrus (or a seal?) - someone drew teeth and an eye on the rock :)

Again a carpet of heather looking east towards roseberry topping


Returning back, east,  along the Cleveland Way to Clay Bank

This butterfly decided to land right next to the car, so why not take a pic!


Wainstones Additional (Evening/Sunset)Walk:

After a really enjoyable first visit to the Wainstones, I thought it would be a great place to return to to try and get some pics of the setting sun, so another trip was made. I didn't get the roaring sunset pic I was hoping for (lack of clouds in the right place and the right time) but it was still a special place to be as the sun was setting on another day.

Cracking views over to Roseberry Topping again


Blinded by the Sun on the way to the Wainstones

The setting sun producing a warm evening glow on the Wainstones
The setting sun producing a warm evening glow on the Wainstones 

With a fairly clear sky as the sun went down - there wasn't much glowing clouds - apart from these!


sunset over the wainstones, cleveland way, north york moors
This was the composition I was hoping to get with clouds glowing yellows, oranges, reds & purples behind - but on this occasion - not many clouds in the sky! Will definitely be back up to try and capture a more dramatic sunset.


Wainstones Route & Map:


This is the simple & short route I took on this occasion (highlighted in yellow in the blue box). From the car park the full round trip can be done in 1 hour without too much stopping.

Due to time constraints, the route I took on my first Wainstones Walk was rather short, as you can see above. However a quick search on the internet will lead you to much longer routes. I found the below route on www.mywainwrights.co.uk

It is rather longer at 7.5 miles, and would take around 4 hours

Wainstones Walking route taking in more of Bilsdale
Wainstones Walking route taking in more of Bilsdale - taken from http://www.mywainwrights.co.uk/2009walks/210609/bilsdale.htm - check the web-page out for pics and commentary.


hope this post inspires you to check out this area of the North York Moors, cheers

Autumn walks in Yorkshire

$
0
0
Staithes at dusk, a unique and quaint little fishing village on the North Yorkshire Coast
Staithes at dusk, a unique and quaint little fishing village on the North Yorkshire Coast

The Temple of Piety in the water gardens at Studley Royal Park


Autumn Wanders in Yorkshire

I didn't really go on any big walks this fall that where worthy of a blog post in their own right - but i did visit a few new places and re-visted some old haunts, and I got some decent pictures all with an autumnal theme - so I thought I'd share them in one blog post.

An Autumnal golden coloured tree in Studley Royal Park.

Studley Royal Park & Fountains Abbey, near Ripon

I'd seen a pic of the Studley Royal Water Garden a while back and noted it down as somewhere to check out at some point - and with the tress turning golden - i thought the autumn would be a good time. the area is a world heritage site covering over 900 years of history, and as well as the Georgian Water garden you can explore the well preserved 12th century Fountains Abbey. Definitely good for a day out - for further info visit www.nationaltrust.org.uk/fountainsabbey/

Fountains Abbey - Britain's largest monastic ruin and most complete Cistercian abbey, built over 900 years ago - pretty impressive!
Britain's largest monastic ruin and most complete Cistercian abbey, built over 900 years ago - pretty impressive!

Fountains abbey is still really well preserved


The Temple of Piety in the water gardens at Studley Royal Park
Really nice colours on the trees - Another shot The Temple of Piety in the water gardens at Studley Royal Park!

There are lots of follies dotted around Studley Royal water garden - not sure how you got up to this one...


An autumn woodland walk in Hackfall wood:

I had made my first visit to Hackfall Woods earlier in the year (see my summer Hackfall Woodland Walk blog post here) and thought it would be good to return in the Autumn to see how the place changed. 

Once again I wasn't disappointed and it was another pleasant walk, but with the air cooler & fresher, the forest floor covered in leaves, and those leaves that where still on the trees having turned a lovely golden colour.
Looking down a higher than normal River Ure which cuts right through Hackfall Woods - with the sunlight illuminating the golden trees


I'd photographed these waterfalls earlier in the year - the only difference being the carpet of leaves, in and around the cascades.


Sutton Bank, Whitestone Cliff and Gormire Lake in Autumn:

This area is classic walking terrain for those wanting great views with easy access in North-Yorkshire and I've walked these parts many times - definitely recommended for a nice autumn stroll with the family!

I thought the Gormire Lake / Whitestone Cliff view would make a good composition for an autumn landscape, so I decided to venture down at dusk one evening  hoping to catch a roaring sunset. The sunset wasn't to be - and the light wasn't as good as i hoped - bit muted - but the picture was fairly decent. I'll be paying a visit to this area again in future as it's such a good walk - so stay tuned for more of this composition at different times of the year. 

Staithes, Yorkshire Coast, on an Autumnal Evening:

When the leaves have fallen and the weather is a bit grey and bleak - there are still good photo opportunities to be had - and on one particulary bleak saturday I thought I would visit the old Yorkshire fishing village of Staithes, have a potter around and see what turned up. Staithes is a very unique place and well-worth a visit - either in it's own right or a stop-off on the much longer cleveland way. My visit was fleeting - but I really enjoyed the atmosphere of the place and when the night began to draw in - the lights came on and made for a really nice composition.

Staithes at dusk, a unique and quaint little fishing village on the North Yorkshire Coast
Staithes at dusk, a unique and quaint little fishing village on the North Yorkshire Coast


Thanks for reading - and I hope you are inspired enough to want to pay a visit to some of these places - whatever time of year!

Best Hadrian's Wall Walk & Best View: Steel Rigg to Housesteads, including Sycamore Gap

$
0
0

Hadrian's Wall Best Bits: Some photo highlights of the best views Northumberland has to offer from the best part of my Hadrian's Wall Walk from Steel Rigg to Housesteads:


Best Hadrian's Wall View, Sycamore Gap, Robin Hood prince of thieves, best view, Best Hadrian's Wall Walk
One of the Best Hadrian's Wall Views and a much photographed point on Hadrian's Wall is Sycamore Gap. A superb setting, which was made even more famous in the Robin Hood "Prince of Thieve's" film.


Hadrian's Wall Best View, on the best Hadrian's Wall Walk,
An impressive sight - perhaps my Best Hadrian's Wall View of the day on the Best Hadrian's Wall Walk. This photo gives a real sense of the sort of terrain and landscape that Hadrains Wall covers, a monumental feet of human effort!


The Best Hadrian's Wall Walk with the Best View?

The only time I had been to Hadrian's Wall before this walk was on a visit when I was in primary school. So I thought it was about time I revisited the place. Writing this post after doing the walk - I can't believe I had waited so long - as this stretch of Hadrian's Wall is a magnificent walk, full of spectacular Northumbrian landscapes around every bend, brooding with fascinating history, character and the stuff of legend. For a walk of about 3 miles i don't think there are many better or more interesting...

Map of the best Hadrian's Wall Walk Route - Steel Rigg to Housesteads Roman Fort
The map of the best Hadrian's Wall Walk Route (in my humble opinion! click image to enlarge) I parked at Once Brewed and walked a short section of the wall from Steel Rigg to Housesteads Roman Fort, west to east. You can walk back from Housestead's - but the frequent & punctual bus service was my preferred way to get back to Once Brewed!


The Best Hadrian's Wall Walk and the Best Views....

Being 73 miles long and stretching from coast-to-coast, I had to do a bit of looking around on the web to figure out the best part of it to visit, the part with the best views and where the wall would be most intact. The section of Hadrian's wall I choose to walk was from Steel Rigg to Housesteads (map below), and is just under 3 miles and then you can explore Housteads Roman Fort at the end of the walk.

We parked at the Once Brewed Visitor Center (£3 all day) and then got the Hadrian's Wall bus back from Housesteads (£1.20 single adult fare - runs around every hour - 2012 timetable link at bottom of page). You can do a circular walk if you wish (and maybe take in Vindolanda) - but obviously this doubles the distance. The route we took is below, and is highly recommended, as you can do it in a couple of hours and grab a bite to eat at the end of it all in the visitors centre.


how high the original Hadrian's Wall must have looked
A photoshopped image found on the internet (link here) of how high the original Hadrian's wall was and how Hadrian's Wall might have looked when it was built. Don't get too excited it's only a few feet high now....

Hadrian's Wall - Very Brief History...

The history of Hadrian's Wall is better read in depth elsewhere, like on WikiPedia here, but I will give a brief overview as best I can.

Construction by the Romans began around 122 AD under the instructions of the Roman Emperor Hadrian. It stretches 73 miles across Northern England from the Solway Firth on the West Coast to Wallsend in the East Coast and at the time all land south of the wall was part of the Roman Empire. Apparently the wall originally was around 16-20ft high in many parts, but now not much of it is left in terms of height - being only a few feet high in places. There is still no agreement on why the wall was built, some believe it was built to keep the "Barbarians" north of the wall at bay (Scotland as a term had not yet existed - these so-called Barbarians were the Picts and the Celts). Some scholars say those north of the border where not much of a threat really and it could be more likely the wall was just built to reflect the power of Rome and how far its Empire stretched.


The full Hadrian's Wall Route from coast to coast.
My walk was only a very short part of this, covering the best, most scenic route, and began at the 'Once Brewed' point on the map above. See the more detailed map higher up the page for a more in depth account of the section i walked.


The photos from my documented Hadrian's Wall walk and the best views:


This is where we parked - the Once Brewed Visitors Centre, where you can also find a manned tourist information centre and toilets! £3 to park all day.

Walking up towards Steel Rigg

This is where we got on the actual Hadrian's Wall path at Steel Rigg.

The first time we glimpse Hadrian's Wall on this walk, going up East towards Peel Crags, and we would follow the wall now for just under 3 miles.

View from the summit of Peel Crags looking back, towards Winshield Crags

Walking east along Peel Crags to Milecastle 39

Coming down the hill to Milecastle 39

First glimpse of Highshield crags & Crag Loch, hadrians wall
First glimpse of Highshield crags & Crag Loch


Sycamore Gap, Hadrians Wall

One of the most popular, most photographed and iconic images of Hadrian's Wall is Sycamore Gap, made famous in the Robin Hood: Prince of Thieves film. Now most of us know Robin Hood was supposed to be from the Nottingham area, but I guess the director took a bit of creative license and filmed in locations all over the North of England - whilst giving the impression it was all in the same place!

Some of you may be wondering - where is Sycamore Gap?

Sycamore Gap is located just to the east of Milecastle 39 (maybe only 100m or so) - if you look at the map at the top of this page - Milecastle 39 is to the east of Steel Rigg - and to be exact on the map above, Sycamore Gap is actually just above the 'L' on 'MILECASTLE 39' - so not far at all from Milecastle 39. The closest place to park to sycamore gap is Steel Rigg car park or Once Brewed Car Park) - and it's about a 15minute walk from the car park to sycamore gap. Hope that little bit of pin pointing helps - as it was seeing photos such as those of Sycamore Gap that made me want to visit the area, but from searching on the internet - i couldn't actually get a good idea of where exactly sycamore gap was - only that it was somewhere between milecastle 39 and 38!

Anyway, as Sycamore gap was one of the reasons I came to Hadrian's Wall, when I did get here, I got a bit snap happy :-) so there are quite a few pics of the Sycamore Tree here:

First glimpse of Sycamore Gap, one of the best views on Hadrian's Wall.


Perhaps my best photo I took of Sycamore Gap, one of the best views on Hadrian's Wall.
Perhaps my best photo I took of Sycamore Gap, one of the best views on Hadrian's Wall.


Heading up to Highshield crags looking back to Sycamore Gap, Peel Crags and Windshield Crags in the distance

Pretty much above Crag Loch now


Looking back over Crag loch with Windshield Crags in the far distance

The track now goes up beside Hotbank Farm House

Stood on top of Hadrians Wall, looking back again to Crag Loch

This was one of, if not the best, view of the day on Hadrians Wall, so I took a few slightly different photos here. 

The camera is actually resting on Hadrains Wall here

Hadrian's Wall best view on the best Hadrian's Wall Walk.
An impressive sight - one of Hadrian's Wall best view on the best Hadrian's Wall Walk. This photo gives a real sense of the sort of terrain and landscape that Hadrains Wall covers, a monumental feet of human effort!


Onwards east again now along Hotbed Crags, with Broomlee Loch just about visible to the left.

Another pci looking back to the path just covered, I'm still impressed by that view :-)

Looking east, Broomlee Loch again in shot


I didn't realise the Pennine Way came this far North, but I stay on the Hadrian's Wall route

Housesteads, hadrians Wall, Best Walk, Best View
This is the first glimpse of the Houseteads section on Hadrians Wall, where the trees are.


When you get to the Housesteads section, there is actually a designated path on the wall, and this is where todays walk ends.

Here we are at Housesteads visitor centre, where there is also a well preserved Roman Fort. We didnt have much time to explore the fort this time, with the Bus now due, but I will come back :-)


So that wraps this documented walk up. I really recommend a walk on this section of the wall - as it offers for me, the best of what Hadrian's wall has to offer, and I hope this blog post inspires you to want to visit it, Stuart.


About me, Stuart Hodgson


More information on Hadrians Wall:


HWD Bus AD122


In this walk we got a bus back to the carpark at Once Brewed Visitor Centre from Housesteads. If you want to see as much of the actual wall as possible, then a liner walk is probably best as you can go further, and the bus is very useful to get back to where you started. I found information on the bus service here (The bus you want is the HWD Bus AD122 - it departs roughly hourly - but check the exact times first!):
http://www.hadrians-wall.org/page.aspx/Interactive-Map/Hadrian's-Wall-Country-Bus


Vindolanda & the Roman Army Museum

We didn't get chance to spend any time here, but if you have more time I would recommend checking out these 2 places as there seems to be a lot going on, including a 3D film from Hadrian's Wall back in the day and how it actually was, which I would have loved to have seen. From what i can gather - you can buy one ticket which gets you access to both places, which are separated by a few miles. Hopefully I will come back here at some point! More info can be found here www.vindolanda.com


Finally - one more of my photo's - it's a black & white version of my best shot of the day :-) Thanks for reading, comments are very welcome


Roseberry Topping Bluebells

$
0
0
Roseberry Topping - Bluebells in Newton Wood


This is the view looking the other way to Roseberry Topping - the colours from the evening glow where magical

Roseberry Topping - Bluebells in Newton Wood
Roseberry Topping - Bluebells in Newton Wood. For the location of this shot - see the map below.

How to get to the best vantage point from which to see Roseberry Topping and the Bluebells:


Basically park at the car park at foot of rose berry topping lane. Its on the map below in the middle right at the top. When the bluebells are out - the walk through newton wood is magical - and you might even get to see some deer!

From the car park head up roseberry lane then into newton wood up the steps – then turn right through newton wood when you come to a bench. There are a few paths through newton wood – take any but just keep walking south for about 20-30mins and you will eventually come to an opening which is a small field covered in bluebells. The best views are at the most elevated part of the bluebell field – next to the fence bordering a grassy field (where the circle is on the map) - which isn't to far away from cliff rigg quarry. On a spring evening it's an stunning walk through bluebell wood - I just couldn't believe how many bluebells there were. Obviously the bluebells only make an appearance in the spring - I'm told mid may is traditionally the best time when they are in full flower - although spring was late when I done this walk! (june 2013).


Map showing my location to take the best picture of roseberry topping bluebells
Map showing my location to take my best picture of roseberry topping bluebells

High-Force Walk in Teessdale

$
0
0

High-Force

As this post has a bit of a waterfall theme going on - I'm going to share another waterfall pic that I took of High Force, a waterfall on the River Tees, near Middleton-in-Teesdale. 


The above picture was taken on a fleeting visit - but there is a god walking route you can do that takes in lots of waterfalls in the area, below, which I plan to do at some point. More information on this walk can be found at www.mywainwrights.co.uk/


A walk map/route taking in high force, low force, bowlee falls and bleabeck force. distance 7.5 miles / 3hours or so - map from www.mywainwrights.co.uk

Mount Snowdon Walk via Crib Goch Ridge

$
0
0

Mount Snowdon Horseshoe Walk via Crib Goch. Saturday July 20th 2013


Crib Goch ridge, Snowdon walk
Looking along the Crib Goch ridge to Garnedd Ugain on the Mount Snowdon walk. The Crib Goch section of the walk is definitely the best and most exhilarating ridge walk I've done in the UK to date.

Getting there:

I live in north-east england so it was a case of a few hours drive to get anywhere near snowdon. We therefore stayed 2 nights in wales (fri & sat)  - and made an early morning drive to Snowdon on Saturday 20th July 2013.

The car park at Pen-Y-Pass. Unfortunately for us it was full when we arrived in the car at 8am in the morning! It does say on a lot of forums etc that the car park gets full quickly - but we thought at 8am we might be ok. It was a Saturday and in the middle of a good spell of weather - but I suspect it may get full early on most weekend days - so take this into account. We headed down the A4086 road to Llanberis and were fortunate to get parked in a layby about 2miles from Pen-Y-Pass. I guess there were free parking spaces here for about 10 cars. There is also a regular bus (every 20mins or so) which runs from Llanberis to the Pen-Y-Pass car park, which for just £1 and taking 5mins or so will save you a 2mile walk up hill (and conserve precious energy for the proper walk). So my advice if travelling in a car would be that if you can't get parked at Pen-Y-Pass - head to Llanberis - you might get parked in a lay-by - if not then you should get parked in Llanberis where you can get the bus to Pen-Y-Pass. You could do a walking route from Llanberis - but this would mean missing out on Crib Goch, which for me, is the best section of the walk.


Map route of the Snowdon Horseshoe via Crib Goch:


The Snowdon Horseshoe walking route (click for bigger image), best tackled in an anti-clockwise direction via, Crib Goch, Garnedd Ugain, Snowdon then Y Lliwedd. It's about 7.5miles in total. We actually didn't complete the Horseshoe on this walk - instead opting to come down from Snowdon via easier route of the Miners Track. The day we done the walk was in the middle of the July 2013 heat-wave and on one of the hottest days of the year. After catching a lot of sun, and expending a lot of sweat in the heat, the prospect of a swim in the Glaslyn tarn at the foot of snowdon was a lot more appealing than going on to tackle another peak in Y Lliwedd! Next time in cooler conditions we will do the full Horseshoe


The walk:


Right - onto the walk. From the car-park there are a few routes you can take out of it. If you plan to do Crib Goch on the walk - and I recommend you do if the weather conditions are right, then it's best to tackle Crib Goch first as it's best to to the initial steep climb of it first - rather than come down a very steep way at the end. Also - I guess you want to do Crib Goch when you have most energy - so at the start! So the route we took out of the car park was the most direct path to Crib Goch (the highest peak you can see in the picture above).


The initial path to Crib Goch is quite straightforward and a nice leisurely way to get warmed up!

Looking down the valley towards Llanberris & the lake of Llyn Peris. You can also make out the A4086 road where we are actually parked in the distance.

As we near Crib Goch the path starts to get a little steeper.

We begin to gain height fairly quickly as we approach Crib Goch and you can see the Pen-Y-Pass car park in the middle of this photo.

Crib Goch looms closer!

This is where we meet the Pyg Track and where you get chance to consider if you really want to do Crib Goch haha. We met up with a group who considered Crib Goch - but then decided against it. This junction is a good place for a rest and to whack a bit of food and drink into you for the challenge ahead. We where definitely going for Crib Goch - so we didnt take the path above. You do get your first glimpse of Mount Snowdon here and the views are quite breathtaking.

Me (red top) and my mates - already got a bit of a sweat on!

You can't really miss the start of the Crib Goch path - although after here it is rather undefined and it's just a case of heading for the top, either following others ahead, or making you own way.


As you can see - there isn't really a path in much of the places - it's just a case of scrambling up. It is pretty straightforward though - you might have to use both hands - but it's not too technical.

It is quite physical the initial climb to Crib Goch - so we stopped at a few places to take in the magnificent views and get a bit of water.

In parts on the climb up - you can feel a bit exposed and your mind can play tricks on you by thinking there are sheer drops round every corner - but I felt quite safe to be honest. It's just a case of mind over matter for those who have doubts. Just concentrate on where you are on a the fairly straightforward climb and don't let your thoughts get the better of you! Just enjoy the exhilerating climb!


Like all the ridges I have climbed in the UK, including Striding Edge & Sharp Edge in the Lake District, I always think that photos make the ridges look worse than how they actually are when you are on them. Some photos give the impression that people are on the cusp of sheer drops all the time, and one mis-palced step and you are a goner! But in reality they are a bit more gradual when there in person, and quite safe. As long as you take your time, and be sure of your footing - you will be fine :-)

Nearing the top of Crib Goch here - again it's just a case of finding your own way - and trying to keep an eye of for the Cairns (piles of stones) which show you where to head. But as long as you head up - you can't go wrong really!

I catch a glimpse of Mount Snowdon just to the right!

It gets less of a climb and no real need to use your hands as you approach the top of Crib Goch.

Crib Goch ridge, Snowdon walk
At last, teh climbing is done and time for a rest-bite! Looking along the Crib Goch ridge to Garnedd Ugain on the Mount Snowdon walk. The Crib Goch section of the walk is definitely the best and most exhilarating ridge walk I've done in the UK to date - if you have done a bit of walking/scrambling before, and have a head for heights - then go for Crib Goch - I can't recommend it highly enough!

It's a popular ridge - and no doubt others will be up there too. Some go faster than others - and just be patient if you get stuck behind someone who is just shuffling along! The ridge has a gentler gradient on the left side - and most choose to walk just to the left of the ridge in parts and use the top of the ridge as a sort of hand rail for the right hand. I found in some parts you could quite easily just stand up on the ridge and walk (if you have a head for heights) - in other parts I did want to go a bit slower and hold onto a bit of rock!

Looking back along Crib Goch. 

There are 3 pinnacles (rocky out crops) along the ridge. You can either go straight over the top of all of them, or it's a bit easier if you go to the left of the first 2 - then straight over the last one.

We went to the left of the first pinnacle so we could stop of for a rest and some food. In the picture above you can make of the 2nd pinnacle to the right and the 3rd pinnacle in the centre. In the above shot there is a little boy, aged 7, in the green top, who was walking the ridge with his dad - and they didn't seem to have too much difficulty!

On our rest point to the left of pinnacle 1, looking back along the ridge and where we had come from.

While the pinnacles again are not greatly difficult - you do need a head for heights!

Heading towards the 3rd and last pinnacle - it was quite easy to climb over this and is recommended as the most straightforward way to continue the walk.

The views are incredible from the pinnacles and by now you are really used to the exposure of height - and if you have got this far - nothing else will phase you!

Coming down from the last pinnacle. The most challenging parts of the walk are when coming down from the pinnacles as you have to go backwards. But if you go slow and make sure of your hands and feet its fine. I would imagine it's a lot easier doing the walk this way though and wouldn't like to think I had to make a descent of Crib Goch at the end of the Horseshoe walk via the way we climbed up it!

The decent of the last pinnacle and looking once again to the next peak - Garned Ugain.

Snowdon has now disappeared from view in the mist and I wonder if we are going to be able to see off the summit

A pic of me on the last pinnacle - bit knackered - but chuffed with myself for tackling Grib Goch! Nothing else will phase me on ridge walks now!

A view down towards the Llanberis area & the lake of Llyn Peris.

A good view of Crib Goch and the ridge we have just walked. I guess it looks a bit daunting from this angle - but it's superb ridge to walk.

Snowdon clears a little

Looking back to Crib Goch once again

Heading up to Garned Ugain - some more scrambling involved again - but fairly easy

Little bit of mist still over Snowdon

A little bit of another ridge to Garned Ugain - but again fairly easy. By now we were loving the tops of ridges - but there is also a path to the right. 

A picture a friend took of me - with the full ridge we have walked and Crib Goch in the background

Another look a Crib Goch.


A view of Snowdon from Garned Ugain and a great place to soak in the views.

The views we got were superb - and maybe the views of the fella in the glider were even better! Would love to do this one day!

Looking down towards the Pyg Track & miners Track with Crib Goch to the left,

Snowdon to the right with Y Lliwed in the distance,


The summit of Garned Ugain to the left with Crib Goch to the right - and where we have just walked from!

An easier way to get to the top!

As our path met up with the Pyg Track there were a lot more people about walking about - quite busy in fact!

The summit! Although I'm sure it was a little more challenging for us than those who came up on the train!

The cafe summit! A good place to rest, get some food and stock up on refreshments. A good job really as we had got through most of our water

A well earned bottle of chilled lager :)

After walking for around 4 hours in the middle of the heatwave to reach the summit of snowdon - we decided the appeal of a swim in the tarn was better than to continue the Horseshoe walk

Heading down the Pyg Track

Looking back up to snowdon

A perfect way to round off a cracking walk! Normally a tarn is far too cold for me - but it was just perfect in 30c heat!

From here on in it was a nice leisurely stroll back to the car car park.


A mountain rescue helicopter going responding to a call from someone in need. A reminder that you've got to be careful on these sort of walks.


After about 7 hours walking - with about 2hours of stopping I'm pretty much at the end of the walk here and just about spent up. Ready for an ice-cream at the car park :-)

Like I said - we didn't do the Horseshoe Route in the end - but will next time in cooler conditions. I reckon you could do the full route in about 7-8hours with time for stopping here and there

Well I hope that gives you a good idea of what to expect when walking to Mount Snowdon via Crib Goch. Having not been before I tried to do as much research as poss as to what to expect - and I figured that if the weather was dry and non-winter conditions - then everyone in our group would be able to tackle Crib Goch, and that was the case. If you have done a bit of walking before then I really recommend this route, and do think that its easier than the impression pictures give. If you've got any questions or want to know anything else - feel free to comment on the blog and I'll try and help out.

Happy walking
Stuart
Viewing all 189 articles
Browse latest View live